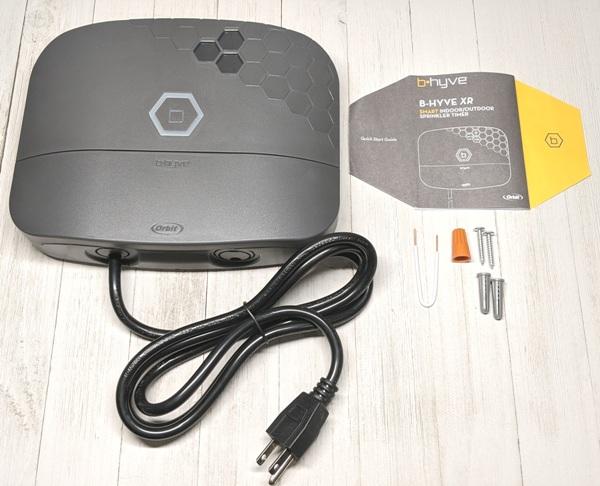
REVIEW – Sprinkler systems are a must for your lawn when you live in a hot dry climate like it is here in Texas. The summer heat and sun are brutal and it takes a LOT of effort to have a nice looking lawn. Also, the HOAs here require your lawn to look somewhat presentable, so we don’t really have a choice. Our existing Rain Bird sprinkler controller is the one that was installed when the house was built. It works well but has only one program, and it doesn’t have any remote control capability. When the Orbit B-HYVE XR came up for review, I was eager to try it out so that I could have more flexibility in how I controlled the watering cycles, plus the ability to control it from my phone instead of having to go out into the garage.
What is it?
The B-HYVE XR is a Wi-Fi and Bluetooth-enabled sprinkler controller/timer that provides “smart” functionality through multiple programs to allow you to control when your sprinklers run and for how long. This controller is designed to operate an in-ground irrigation system with up to 8 or 16 zones (depending on the model), and also includes water-use monitoring, water conservation features, and WeatherSense programming. The controller is primarily operated from the app on your phone or other device, so it gives you control of your sprinkler system from anywhere.
What’s in the box?
Hardware specs
| App Compatibility | iOS – iPhone iPad and iPod Touch running iOS 13 and higher. Android – Android version 5.0 and higher. |
|---|---|
| Smart Home Compatibility | Amazon Alexa Google Home |
| Zones | 8 or 16 |
| Power Requirements | 120V AC/60Hz Input 24V AC Output |
| Transformer | Internal 1 amp |
| Power Cord Length | 54 inch UL 1951 Approved |
| Bluetooth | 5.0 |
| Wifi Bandwidth | 2.4Ghz and 5Ghz |
| Programs | 4 |
| Sensor Compatibility | Supports Most Rain/Freeze Sensors |
| Master Valve / Pump Relay Compatibility | Yes |
| Lockout | Yes. Digital. |
| Warranty | 2 Years |
| EPA/WaterSense Approval | Yes |
Design and features
The B-HYVE XR that I received is for eight zones and is contained in a fairly ruggedly constructed plastic housing. The unit is rated for indoor or outdoor installation with an IP65 rating which means it is completely dust-tight and rated for “low-pressure jets” of water directed from any angle (i.e. rain). The unit contains an easily removable cover to access the wiring connection ports.
The front of the controller contains three small hexagon-shaped LED display screens that provide information, depending upon the mode of operation. In the normal operating mode with power on and the sprinklers not running, the upper right screen will display the current weather and the time (swapping between the two every four seconds).The lower right screen will display the next sprinkler start time, and the left screen will display the next sprinkler start date. During setup, these screens will display different information. Also, when the unit is irrigating, the three LED screens provide information about the operation; the upper right screen displays the program, the lower right screen displays the remaining time, and the left screen displays the zone that is running.
Also in the center of the controller is an LED-illuminated letter “b” surrounded by an LED-illuminated hexagonal ring. The color of the LEDs indicates the following (based on my observation only; I could not find any Orbit documentation indicating what all the colors mean):
The “b” in the center is also a button that can be used for manual control of the unit. It is the only manual control on the unit, which means that it requires a somewhat complex series of long and short single or double presses to control the unit. Fortunately, they placed these instructions on the inside of the removable cover for easy reference.
Then at the lower front of the unit underneath the removable panel are the wiring connections for the 24VAC supply to the sprinkler control valves. There are 8 termination points with gray buttons for the 8 zones that this unit can control, numbered 1 through 8 plus a white COM port for the common wire.
There are also two terminals labeled PUMP and COM that can be used to control a pump or a master valve (labeled MV on some other sprinkler controllers). Many municipalities require a master valve in the supply line downstream of the backwater valve as an additional protective feature and to limit water leakage. The controller will open the master valve when any of the zones are running. Also, some installations may not have city water, so in that case, this connection can be used to start an irrigation pump.
There are two blue ports that can be used for a moisture or freeze sensor that will prevent the unit from running in rainy or freezing conditions. The controller comes with a jumper installed across these ports (removing the jumper will prevent the unit from working unless a sensor is connected).
And finally, two 24VAC terminals are provided to power any external rain or freeze sensor. I am not certain there is any control feature associated with those ports since there is no documentation provided on these, but it is likely that these provide continuous power.
The bottom of the unit contains an opening to route the sprinkler control wiring (on the right in the pic above). You can simply run the wire through the existing hole, but knockouts are also provided for 1/2″ and 3/4″ conduit fittings. The left hole is the pre-installed 120VAC power cord. A 1/2″ knockout is provided here in case it is desired to run the power supply in a conduit (which is not required).
The back of the unit contains a bracket for a mounting screw at the top, and a location to drill out a hole for a second screw (bottom center). There is also a 3/4″ conduit knockout in the event you wish to route your sprinkler control wire from behind.
Since this controller is designed to be part of a hard-wired irrigation system, installation of the unit isn’t super easy, but it isn’t so difficult that you have to hire an electrician or sprinkler contractor to do it for you. If you are the kind of person that doesn’t hesitate to replace an electrical outlet or light switch, then you can probably handle doing this on your own, even if you don’t have experience with irrigation systems. If you don’t normally do handy-man type stuff around the house and you have to search to find the one screwdriver you own, then you may want to hire someone. Note that some municipalities may require a licensed irrigator to do this work, but fortunately for me, the city of Fort Worth allows a homeowner to do this themselves as long as it is your home (not someone else’s).
I’ll be providing the installation steps I used, which may or may not work for your configuration. This may serve as a guide to help anyone out there who is going to install this yourself to get an idea of what is involved.
I have an existing in-ground sprinkler system that was installed when our house was built in 2009 that has seven zones. My existing sprinkler controller is a Rain Bird ESP-8TM.
As shown in the photo above, my system contains an external rain sensor (the white box to the left of the controller). The B-HYVE supports this feature, so you can retain the sensor if desired. In my case, the sensor doesn’t work very well, and I got in the habit of just manually shutting off the system during rainy periods. Therefore, I don’t intend to re-install this sensor.
I started by removing the lower cover and the bezel to expose the sprinkler control wire connections. As you can see, the sensor is connected to the common with a wire nut and a jumper wire plus it has two separate power connections. In my case, this connection for the sensor is different from the B-HYVE since it provides two separate sensor connections while the Rain Bird doesn’t have any separate connections, and therefore the sensor is wired into the common line. The sensor would shut down the entire system by interrupting the power through the common line.
The picture above shows the unit power and sensor power connections removed. Now at this point, you will want to make note of the color of each wire and which zone it is connected to. When re-connecting these wires, it is important to retain this connection configuration, or your zones won’t match up. Also, note that the black wire is connected to the terminal labeled “MV”. This is the control for the master valve that I referred to earlier.
The next step is to disconnect the wires and remove the existing unit. Note in the pic above that there is a gray wire that wasn’t used since I only have seven zones.
My existing installation used 3/4″ diameter “conduit” to route the sprinkler control wires to the control unit. Note that this isn’t actual PVC conduit (which would be gray and have a thicker wall) but is actually just some 3/4″ sprinkler piping. Fortunately, code requirements for low voltage wiring typically don’t require conduit to be installed. It is acceptable to route your sprinkler wiring directly into the bottom of the unit, as long as the cable jacket (the black covering that protects all the individual wires) is intact. In my case, they removed the jacketing, and the pipe/conduit looks better anyway, so I’m keeping it.
I installed a 3/4″ PVC male conduit adapter into the bottom of the unit by removing the larger knockout. This works since 3/4″ conduit and 3/4″ sprinkler pipe are both the same diameter (both are made to the Nominal Pipe Size/NPS standard) even though they have different wall thicknesses.
But as you can see the conduit creates a problem when I test fit the unit. The wires are too short to reach the terminal ports. This was easily solved in my case by removing the pipe/conduit and cutting about 3″ off the end. The fittings for this “conduit”, since it isn’t real electric-code required material, were not glued (thankfully).
After cutting the pipe I now have plenty of wire length to make the terminations. This is just a test fit to make sure it will work. Now it is time to attach the unit to the wall.
Next, Idrilled a hole for a second mounting screw. I then removed the existing anchors for our previous sprinkler controller and marked the locations and installed two new drywall anchors in the wall for the B-HYVE. Note that the B-HYVE has a small bubble level which helps to make sure the unit is level. I used two #10 size screws and anchors, not the smaller #14 screws that came with the unit. Either size will work just fine though. However, using two screws is important since the upper screw mount is loose and just supports the weight. The second screw is drilled tight through the unit which will keep it rigidly mounted. Now it is time to terminate the control wires.
This part is super easy. Making sure that there is 1/2″ of insulation removed on the end of the wire, press the button, and insert the wire into the hole. When the button is released, it should be in a slightly different position from the original position as shown above, and the wire should not come out when gently tugged. Continue for the remaining wires for each zone.
For my installation, the black wire is connected to the “PUMP” terminal, which in our case is controlling the master valve. Note also that the white common wire is connected to the COM port. If you are installing the rain or freeze sensor, you would connect the sensor leads to the blue ports (removing the existing jumper) and the power leads to the red ports.
Then the cover can be snapped back into place and the unit plugged into the outlet, and installation is complete. I also used small staples to keep the power cable aligned against the wall.
Next, it is necessary to download the B-HYVE app from the Google Play store or the Apple App Store and install it on your device. The device you use to set up the unit will need to have Bluetooth capability.
Upon starting the app for the first time you will want to select “Create an Account” and fill out the requested information. Then select “This is a new device”.
Select the B-HYVE XR, and make sure the unit is powered on. Also, make sure the Bluetooth on your device is turned on. The app asks to verify the MAC Address of the device, which is displayed on one of the LED screens when the unit is first powered on and in pairing mode. Note also the hexagonal ring is illuminated blue.
The unit should then be connected to your device. Depending on the device you are using, it might be necessary to go into your Bluetooth settings and select the B-HYVE to ensure that it pairs. Sometimes it is necessary to delete (or forget) other Bluetooth devices to avoid a conflict. The Bluetooth on my phone (an HTC U11) is often temperamental when connecting to something new, so I had to do this to get it to connect.
Once you’ve connected via Bluetooth, you can connect the B-HYVE to your Wi-Fi network. Select your network and enter the password. When I did this, I got the error message shown in the third pic above. After a bit of trial and error, we recognized that we missed a step. It is necessary to select the “Advanced” button.
In the advanced settings, you have to select the security type. The app defaults to “open”, which is most likely not the case for any home network. Our network uses WPA2 security, so once we selected that we had no problem connecting. If you don’t know your security type, you can find this on a Windows PC by selecting the properties of the network in the “Network and Internet Settings”, or in the Settings for the network on an Android device. Or you can try each security type till you find one that works.
The B-HYVE is a dual-band (2.4 and 5 GHz) device, so it will connect to a network running at either frequency.
Note that it is possible to control the unit without connecting to Wi-Fi using Bluetooth only, but you have to be within range of the controller to do this. This is useful if the unit is being installed somewhere where there is no Wi-Fi. Note however that some features (like WeatherSense) will not be available without a Wi-Fi connection.
Now you are ready to program the B-HYVE. Starting from the home screen, you have several options.
From the home screen, you can select the “Programs”, “Zones” and “My B-hyve” options at the bottom of the screen to set up the controller. There is also a “Calendar” option that provides information about past and future water events and weather. The home screen also gives you controls to manually start the system, or manually delay due to weather conditions. Note that this home-screen screenshot was taken after I completed all the setup steps, which is why it is stating when the sprinkler system will run next. It won’t state this if you don’t have any programs set up.
Selecting “My B-hyve” and then choosing “Devices” gives you control over unit settings.
For WeatherSense to work properly, it is best if you put in your exact address. These screens also contain the following options:
In the “Weather Adjustment” screen, it is important to set the source of the weather data.
On my unit, it defaulted to a weather radio channel in the middle of Kansas. Once your address is entered in the previous screen, it is possible to select the weather radio station that is closest to your home. This screen also contains the options for percent of rain chance or rain depth, wind speed, and freeze temperatures. Note that the B-HYVE is determining these values based on forecast data from the selected radio station. This will not determine if it is raining at your location and how much.
Selecting “Zones” from the home screen allows setting up of your sprinkler system zones.
For each zone, you can give it a name, and even upload a picture if desired. You can also turn the smart watering features off or on for each zone individually. Under “Smart Details” there are numerous specific pieces of information you can input about the soil type, plant type, sprinkler type, slope, sun/shade, etc. It will even step you through the process of placing “catch cups” to measure the watering rate. Then if you select “Advanced Details”, it gets really complicated where you can enter other parameters like efficiency, plant factor, microclimate factor, etc. I don’t even know what most of that stuff is. I guess that is a research project for another day.
Selecting “Programs” from the home screen allows setting the run times for each zone.
The B-HYVE has four program slots that you can set up at any given time, labeled A, B, C, and D. Tapping the program brings up a screen where the start times are selected. I chose three times in the middle screenshot above, and in response, the app gave me a message to ensure I was aware that I was setting the program up to run more than once per day. The program doesn’t seem to recognize that that is what you are supposed to do. Several shorter waterings are always better than one longer watering because the amount of water lost due to runoff is reduced.
Selecting each zone allows setting the desired amount of run time for the given program. Then the watering days are selected. You can specify exactly which days, or choose even or odd days, or specify an interval. Finally, it is necessary to choose a start and end date for the program.
Note that this is a pretty high-level overview of the basic controls that are available. As I alluded to above, the app is pretty sophisticated and is intended to allow you to optimize the amount of watering so you can minimize water wastage. I did not test all of these advanced features for this review.
After the initial setup issues surrounding Wi-Fi were resolved, the B-HYVE XR controller worked exactly as advertised. My zones all started and stopped as specified, and I was able to manually start the system both from the app and from the unit itself very easily. This is a huge benefit when testing a sprinkler system or adjusting sprinkler nozzles since you can use the app so you don’t have to run back and forth to the garage. The controller in the garage did not seem to have any problems staying connected to our Wi-Fi network except when we shut one of the mesh router nodes down. When powering the mesh router back up, the B-HYVE lost its Wi-Fi connection. I had to go into the app and reset the network connection (using the “Reset Device Connection” option mentioned above in the “Device Detail” screen).
I love having multiple programs for flexibility. This year I planted annual ryegrass in my back yard that grows through the winter, which requires a different watering schedule than my normal Bermudagrass that grows in the summer. I could easily set up different summer and winter programs to accommodate this. The app is generally very well structured and easy to use.
The manual run feature from the unit itself can be a little complicated since there is only one button, but it works as it is supposed to. A second button would have made it much easier to use.
Changing program timing is also very easy from the app, and I love being able to do that at any time and place from my phone. With my old system, I would have to go out into the garage to do that, and I could not change anything if I was away from home.
As a program is running the sprinklers, the app will provide a display to indicate which program and zone are running.
The display shows how much time has elapsed and how much time remains as the program progresses.
The app can also be set up to provide you with notifications of when the programs are completed and when a delay occurs. During my testing, I did not see any indication of problems, but I did not get the opportunity to have a rain delay my program since it has not rained here in quite a while. I have no reason to expect this feature to not work. The only issue is that the delays are based on a forecast of rain, not actual rain, so your program may be delayed unnecessarily. You can easily compensate for this by setting the rain percentage to a higher value, like 75%, which makes it less likely to have your program delayed, but more likely that it will run on a rainy day.
The controller and the app have a full complement of smart watering features that are truly sophisticated. I also did not fully test all the advanced features, but I am looking forward to trying that out. I have some research to do first, and since Orbit doesn’t provide any instructions on how to use these features, it will probably take some trial and error. It is great that this controller with the app gives the homeowner some tools to truly optimize how the lawn is watered with the intent of not only helping to conserve water, which is a precious resource, but also optimizing the care of your lawn and/or shrubs.
One concern I have is longevity. The unit appears well made and should last for many years. However, we have had other app-driven devices turn into a brick once the manufacturer decided to no longer support the app. This can happen when a larger company buys up a smaller one. I hope that doesn’t happen in this case since this is now an integral part of our home.
What I like
What I’d change
Final thoughts
The Orbit B-HYVE XR Smart Sprinkler Timer has a lot of features and is a significant upgrade from most pre-existing sprinkler controllers. The app-driven features provide a level of control and functionality that does not exist for most standard sprinkler controllers. Add to that the full complement of smart watering features and settings with the ability to help conserve water, and this controller is a winner!
Price: $149.99 (8 zones), $179.99 (16 zones) Where to buy: Amazon, Home Depot Source: The sample of this product was provided by Orbit.


